All of Greece in our backyard

4th Grade Geography: chapter 4.
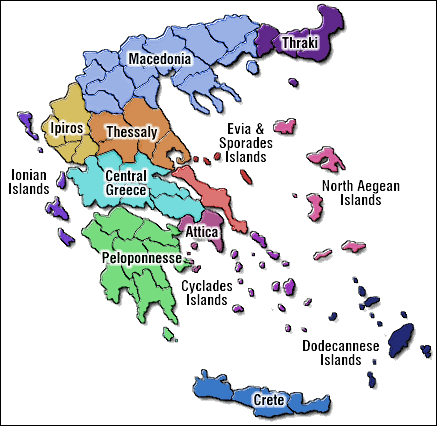
Geographical Regions, map of Greece (Greek educational system)

                                               Kypseli Greece Cyclades Isles

Materials for the lesson

Chalks
A4 size papers
Colors
Blue ribbons (paper or cloth) about 90cm long and 5cm wide (rivers)
Round or oval cut papers in blue color (lakes)

The teacher’s bell

Layout of the classroom

It is recommended to have this lesson in the yard or in an indoors gym. If this is not possible then in the classroom. The desks can be placed on the sides for extra space to move.

This lesson/play/action can also be done and repeated  in  next Geography chapters. So, if for example we make it for the first time, for the Macedonia Region, it can be repeated for the Peloponnese peninsula or the Greeks islands and so  on.

Phase 1

In the first phase the lesson is done in class with the traditional way. So, the teacher gives the first knowledge and information about the geographical regions, the capitals, the rivers, lakes and the products of each Region and area of Greece.

Phase 2

In the courtyard, the indoors gym or the classroom.

The children draw on the floor –always with the direction of their teacher- with a chalk (that is washable), Greece (or Macedonia, the Peloponnese etc) The exact shape is not  important , just that we can see all the Geographical Regions of Greece i.e.

The children stay together upon the Geographical Region that we are now, where their school is and they live and is considered the Base-Region. The teacher speaks out loud the regions one by one and assigns each student to name each regions’ capital (For example Kostas where is the Geographical Region of Evros and which is the Capital. The student goes to The Evros region and writes “Alexandroupolis” and finds its place on the floor. The game and the movement continues with the other regions and capitals.

Phase 3

When the circle of capitals is completed, the teacher can go on with the rivers, the lakes etc.
For the class to have more assortment & selection, movement & aliveness, each student can return each time to the Base Region ( after the assigned Region).

Phase 4

The lesson can become more complicated as it continues. The teacher can introduce the products of each Geographical Region and give a more social dimension.

4th –A  The teacher, for their next lesson, asks from the students to bring some products of the primary section such as  an orange, a peach, a cotton flower, a small vase of honey, some lentils, beans, chick peas etc. Products range according to the areas the teacher has in mind.

4th– B  The students enter the map of the lesson and take place on one Region. Each student (or in couples if students are more or the Geographical regions less) They have with them the characteristic product it produces.

The children say/present one after the other the region that was assigned to each: its capital, lakes and mountains and the products it produces.

4th-C  The students exchange the products that their Region produces with different ones from other Regions, developing in such way relations with their classmates , while conducting basic negotiations skills about the quantity and the value of the products they give and take.

Dialogue Example

  • I come from the Region of Pella and I bring peaches.
    I am at the Viotia region where the cotton is produced
    I give a peach for a handful of cotton.                                                                                           I accept ( the transaction is made)

Then the cotton can be exchanged with honey, legumes or citrus fruits etc